Step-By-Step Guide for Developing on Adobe Commerce Magento Cloud

Adobe Commerce has been one of the most popular e-commerce platforms for all segments of the eCommerce Industry.
Following its top-of-the-range tools, features, extensions, technology, service, and enhancing user experience it gives to both admin and the customer visiting a website, Magento has become the developer’s preferred platform.
Here, we are providing a step-by-step tutorial about

How to develop on the Magento Cloud?
Introduction to Magento Cloud
Magento provides comprehensive hosting, development, and deployment solutions through the Adobe Commerce cloud.
With Magento, commerce cloud users can get a set of additional features that keep this edition ahead of the curve in comparison to commerce and open-source editions. The features are,
- Rapid Development
- Continuous Deployment
- Customizable Environment
- High Scalability
- Enhanced Security
What Is The Magento Cloud Environment?
On subscription to the Magento cloud plan, the user receives several environments. The Magento cloud environment is an autonomous Magento installation, having a separate server and database. It may also have fastly, and New Relic installed in it if the environment is production or staging.
For a starter plan, Magento cloud provides 4 environments- Production, staging, and two Dev environments. Magneto provides 8 environments in the pro plan- Production, Staging, Integration, Global Master, and 4 Dev environments.
What Does This Tutorial Convey?
With the help of this tutorial, we will give you an introduction to the Adobe Magento Commerce Cloud Development flow chart explaining each step in the chart and showing the commands that a user needs to run at each step.
At the end of the presentation and explanation of the tutorial, all the necessary environments will be set up and ready for work. Afterward, we will deploy your first feature to the Magento Cloud.
With this tutorial representation, we will try to make you explain how to install a specific Magento version on the cloud, rather than the default one.
Making you explain specifically about the starter plan of Magento cloud, the starter plan architecture consists of four environments,
- Integration
- Staging
- Production
- Inactive
Integration
The integration environment comprises three testable environments. Each environment of Integration has a Git branch, database, caching, web server, services, configurations, and environment variables.
Staging
The staging environment is a kind of pre-production testing environment. The staging environment by Magento comprises the staging active branch, environment variables, configurations, services (Fastly, New Relic), database, web server, and caching.
Production
The Production environment includes the active master branch, caching, third-party services, environment variables, configurations, and the web server.
Inactive
An inactive environment has an unlimited number of inactive branches accessible by a merchant.
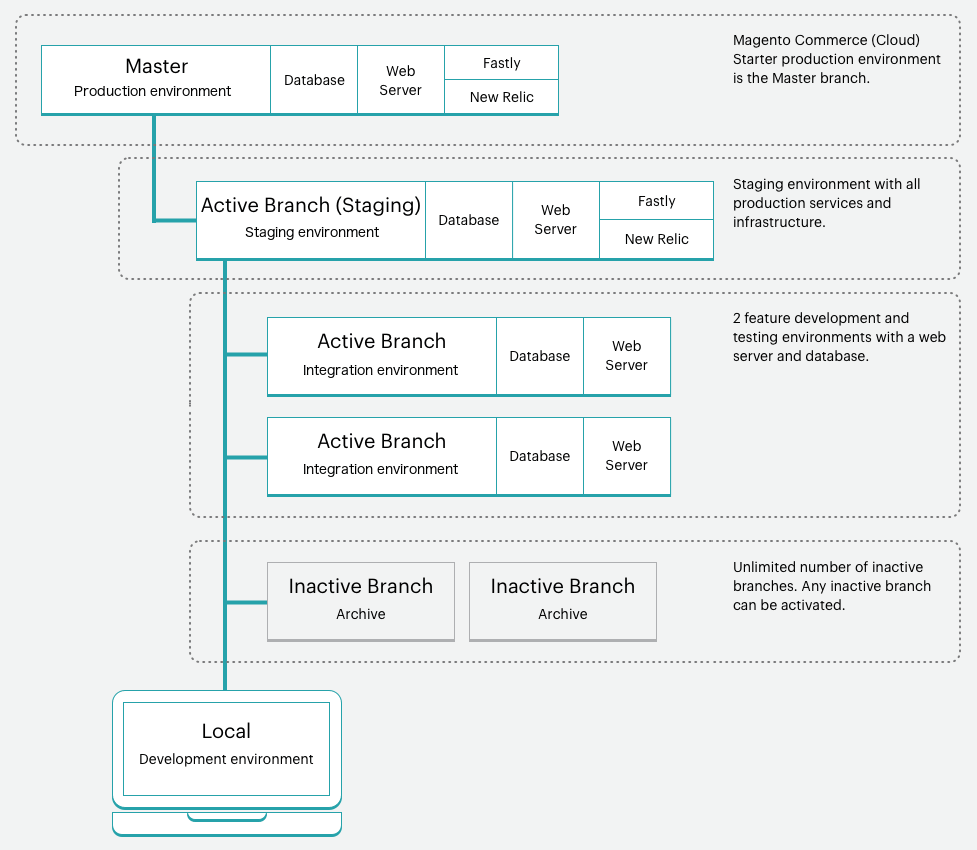
Magento Cloud Starter Architecture Environment. Image credit: Magento.
Step by Step Tutorial Of The Starter Plan On Magento Cloud
Further, we are going to understand and learn about the Starter plan only. Working on the Pro plan is corresponding to the Starter plan, at the end of the article the modifications needed to the flow are mentioned.
Here is the chart of the Magento Cloud Starter plan development flow –
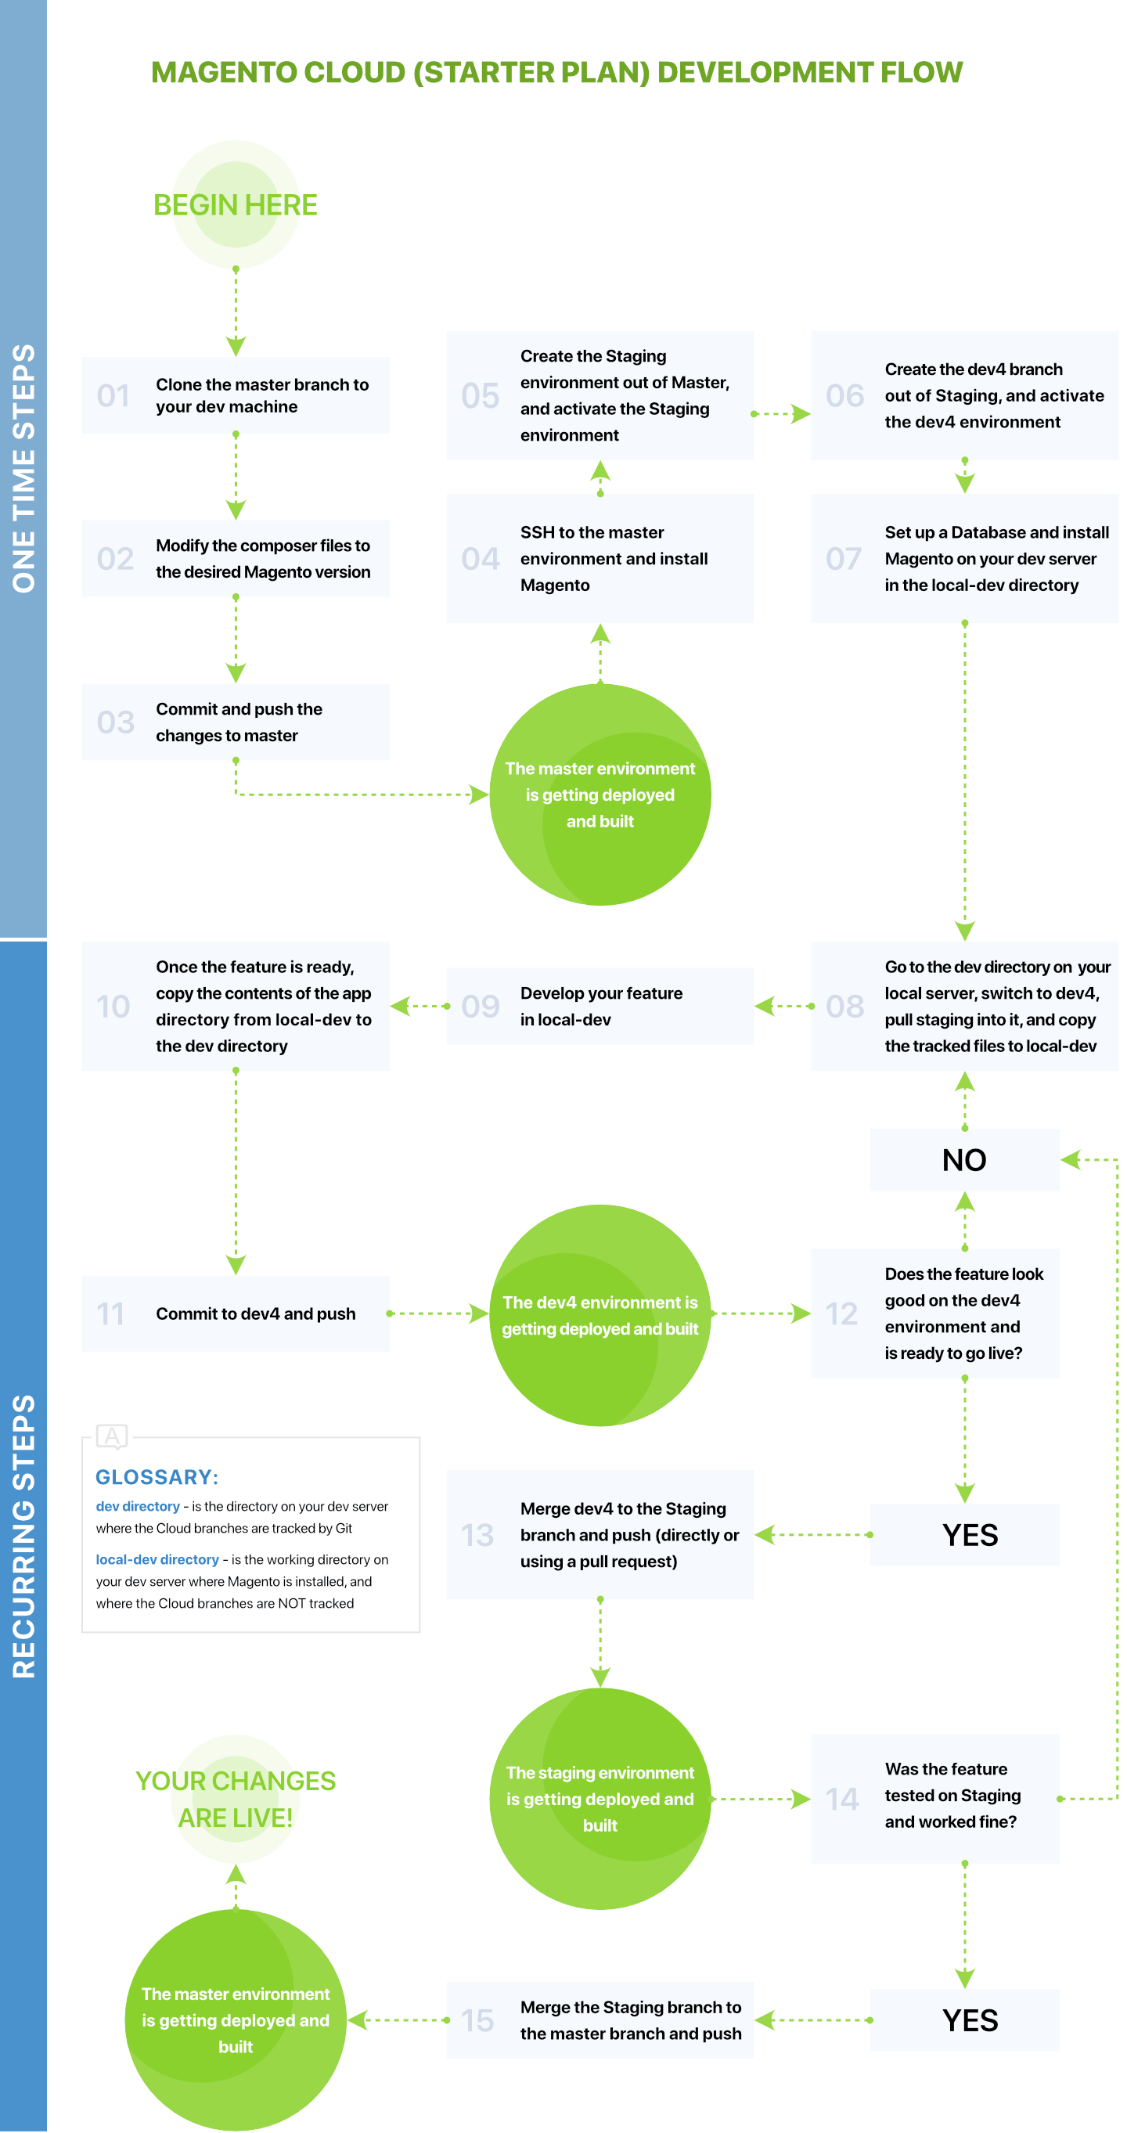
The chart here represents two sections: “One-time steps” and “Recurring steps” respectively. From observing one can estimate that the steps under the “One-time steps” section are followed once – when you set up the environments (master, Staging, dev4) for the first time.
Complete the one-time steps and make the Staging and the Dev environments ready (Dev is the name we gave to our development branch/environment – one can use any different name). Now proceed to the healthy and creative part – the development of your features.
The recurring step mentioned in the chart is the Magento store development workflow. The developer or admin should follow these steps each time whenever he/she develops a new feature and proceeds to publish it to the production (Master) environment.
So, to understand the chart in a better way we’ll go over each step in the chart. We will also try to understand it and show the exact commands that you need to run.
Note: In my dev machine I am using Ubuntu 16.04 with git (version 2.7.4) installed on it.
Ok, let’s start.
Section 1: One-Time Steps
You need to do this part of the development flow while you are setting up the environment, and that too only once.
Once you complete this part of the development, the admin or developer will have the necessary environments like master, Staging, and dev, up and running. You can also start writing some code after completing this part.
Now let’s understand the steps we need to proceed.
Step 1: The Master Branch Need To Be Cloned To Your Dev Machine
(1) Before proceeding further step please ensure you have SSH keys set up on your Dev server and the Magento cloud
Prior to cloning the master branch to the Dev machine, SSH keys in the Magento cloud interface and Dev machine needs to get set up.
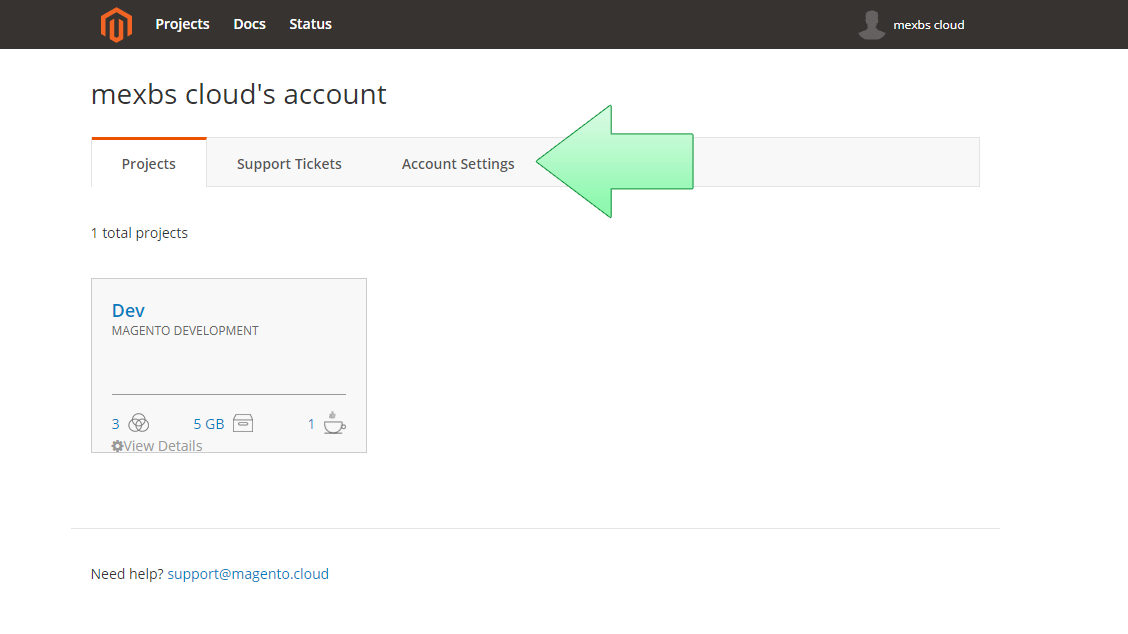
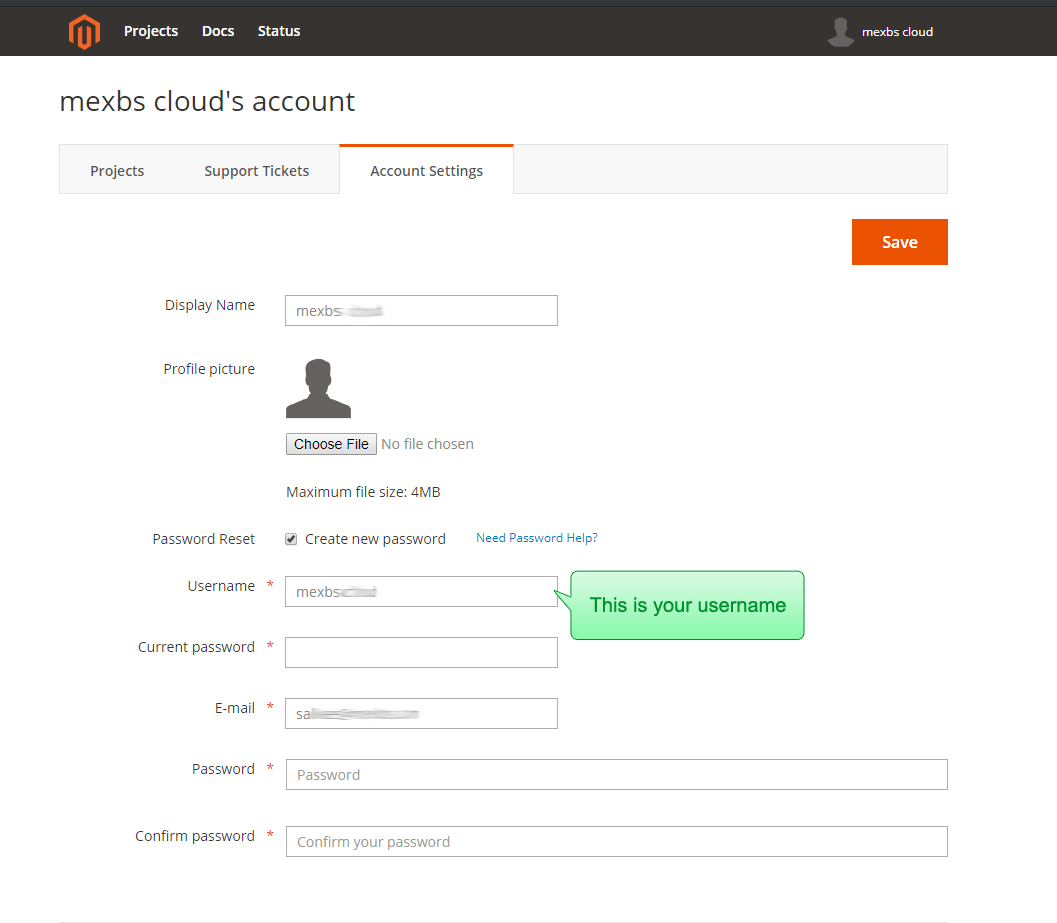
To perform the above step, log in to the Magento cloud interface by this link (https://accounts.magento.cloud/). Then click on the account settings –
Now navigate to the SSH keys section. Now check the keys that are listed in your ~/.ssh directory on your dev machine, the keys in the directory also need to be in the SSH keys list.
(2) Copy The Clone Command From The Magento Cloud
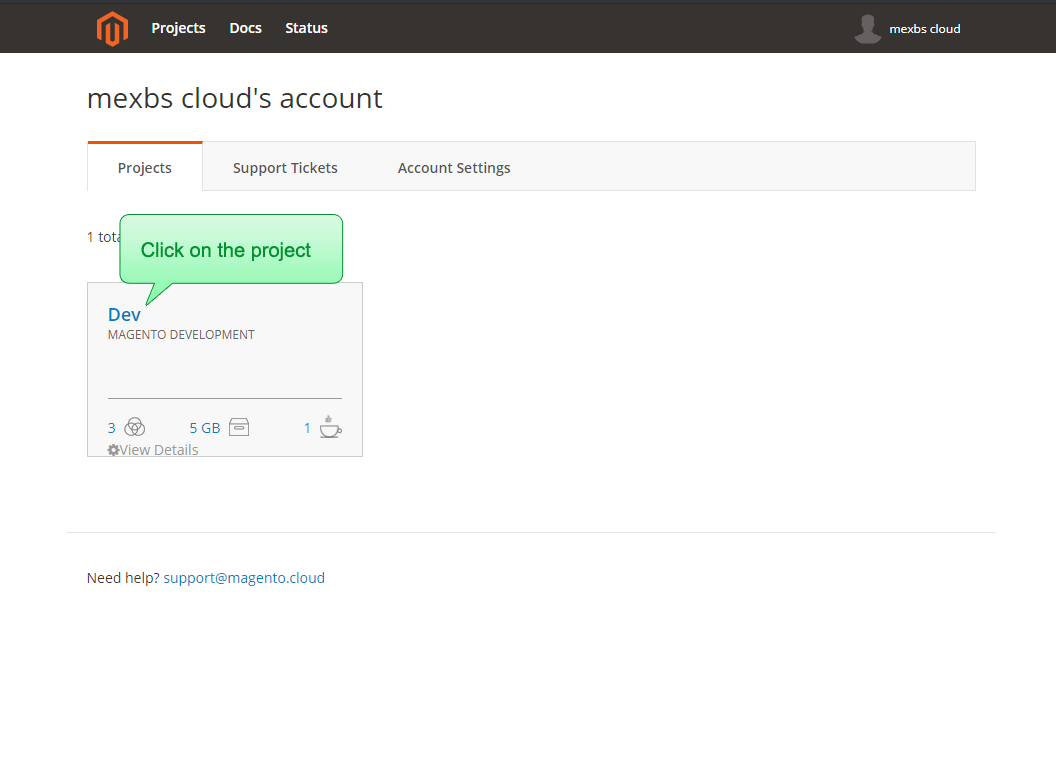
Switch to your Magento Cloud account (https://accounts.magento.cloud/). Now you need to click on the project you want to clone. Here in this tutorial, we only have one project – “Dev” –
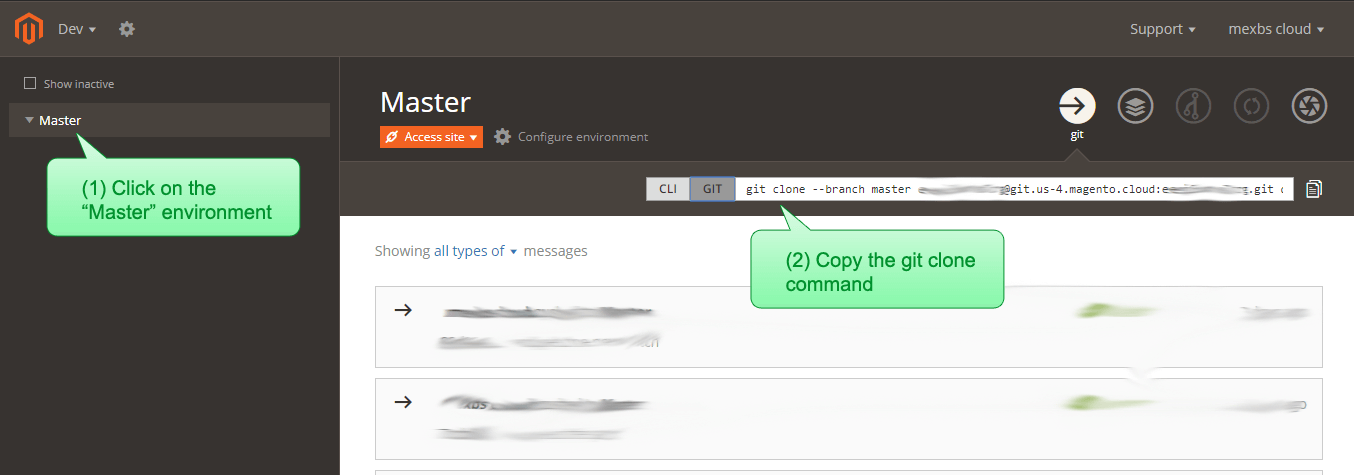
Select the “Master Environment” on the next screen, and now you need to copy the git clone command –
Now follow this step, SS.H to your Dev machine>Go to your working directory
You can take /var/www as an example of the working directory
cd /var/www
Now you need to paste the clone command and it should look something like the following:
git clone–branchmastereepi6abcdefgh@git.us4.magento.cloud:eepi6abcdefgh.git dev
The cloning process needs to be run and finish completely, which eventually creates the /var/www/dev directory.
It also includes the cloned files with it.
If the user directly to the dev directory and does ls -la, the screen will appear something like the below following –
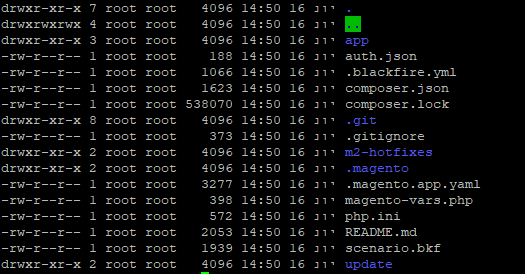
At this moment the vendor directory will not be there. The reason behind it is that it gets dynamically created by the Magento build when changes are commanded to your branch- this will be discussed further in this tutorial providing you guidelines for developing on Magento cloud.
Now, you need to open the .gitignore file. You will see the following screen appearing:
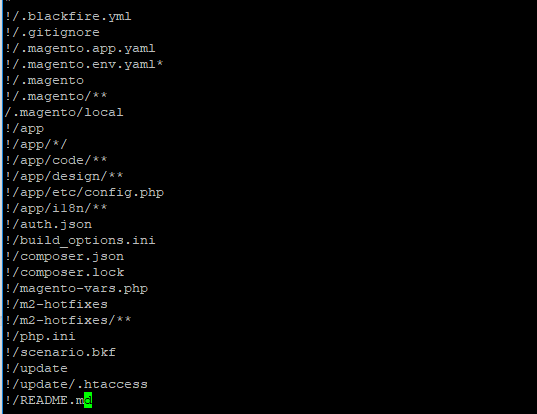
You need to understand here that everything is ignored here except the listed files and directories. For that reason, the admin making the changes needs to take care that he/she makes changes to the files/folders in that list. The reason here is that the Magento Cloud build script will overwrite the others.
Now if you want to undertake any development process, it means that if you want to add a new module/extension you have two alternatives. The first alternative is you do it by specifying it in the composer.json file – with this alternative the Magento build will pull it into the vendor directory. The second alternative is to work on your new module in the app/code directory because the Magento build will not overwrite it.
Note: In this tutorial, we are only focusing on how to develop the module in app/code. The process is almost the same if the admin wants to module to be pulled via composer. Admin needs to make some changes in the 10th step, where instead of copying your module to app/code, the admin needs to pack it up and place it in the composer repository and need to make it specified in the composer.json.
Step 2: Customize The Composer Files As Per Your Required Magneto Version
In this tutorial, we are working on the Magento Commerce Enterprise 2.1.8 version.
To cause the master to build Magento Commerce we need to make sure that the correct PHP version is set in, that is the .magento.app.yaml file. While working with Magento 2.1.8, it should be set at 7.0.
After setting the correct PHP version we need to run the following commands. It will set the composer to use our Magento version:
composer require Magento/Magento-cloud-metapackage 2.1.8 –no-update
rm -rf composer.lock
composer update
Step 3: Committing & Pushing The Changes To The Master
Now, run the commands given below:
git add composer.json composer.lock .magento.app.yaml
git commit -m “Set Magento version to 2.1.8”
git push –set-upstream origin master
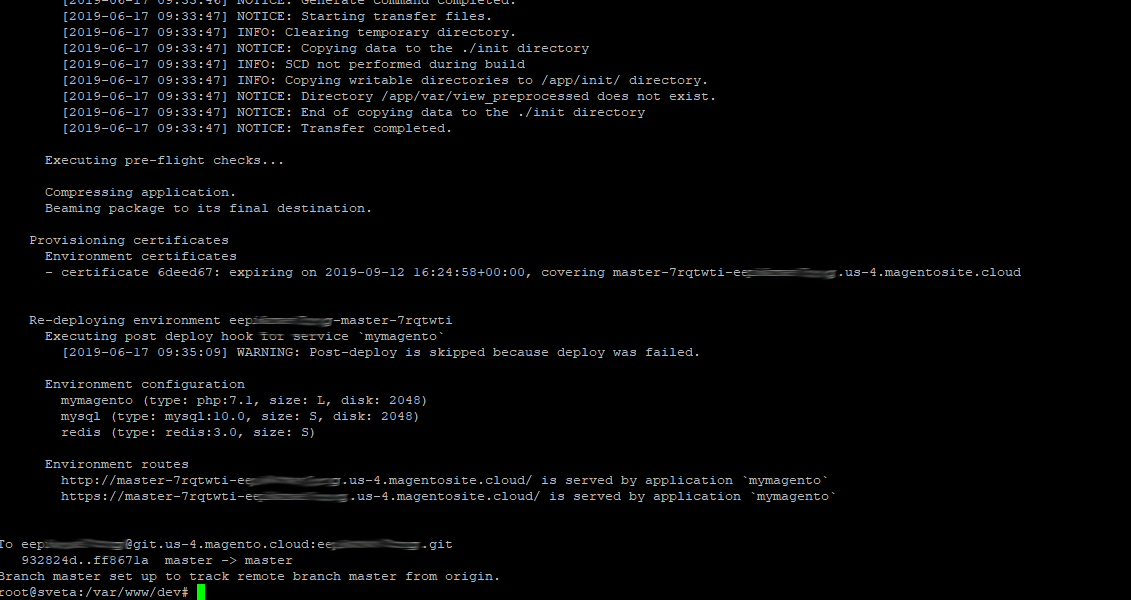
It will initiate the Magento deployment and build. After getting it finished successfully, you will see the following things in your CLI:
Note 1: In case, if an error warning pop up like, “Could not open input file: ./vendor/bin/ece-tools”, you need to go back to step 2, and make sure before the composer update command runs the following command:
composer require magento/ece-tools –no-update
Thereafter delete composer.lock:
rm -rf composer.lock
Now, run the composer update once again:
composer update
Now you need to Re-run the commands of Step 3 again that is add, commit and push.
Note #2: If you encounter the error Failed opening required
‘/app/vendor/composer/../../app/etc/NonComposerComponentRegistration.php’, then you need to run the below commands:
chmod 666 app/etc/NonComposerComponentRegistration.php
git add –force app/etc/NonComposerComponentRegistration.php
git commit -m “Fixed NonComposerComponentRegistration.php permissions”
git push –set-upstream origin master
After completing the successful build, we will get the URL of the “master” website
Now if we try to browse it there Let’s try browsing there, we will probably get the following error screen –
The error popped up as there is no Magento installed on the master -, we should install it now.
Note: It may happen that you don’t remember ever installing Magento and you get a Magneto homepage screen- SSH to the master environment by following “(1) SSH to the master environment” in Step 4. Now, run the command given below to uninstall Magento:
php bin/magento setup:uninstall
Step 4- SSH To The Master Environment; Magento Installation
(1) SSH To the Master Environment
Now follow the following steps,
- Go to the Magento Cloud interface
- Click on the Master environment
- Click on “Access Site”
- copy the SSH Access field –
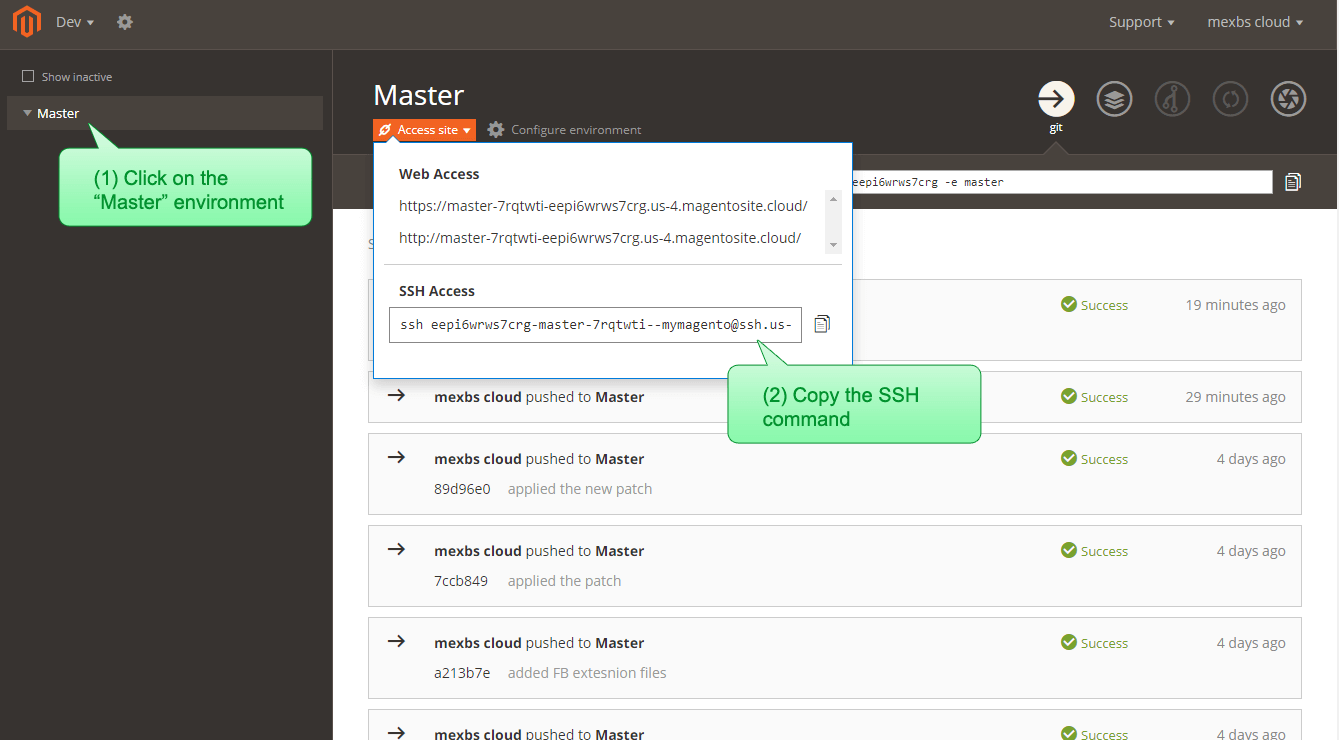
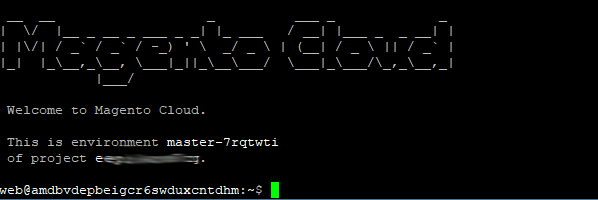
Now you have to paste it into your dev server- and hit “enter”. A welcome message by the cloud will appear on your screen–
(2) Magento Installation
Magento installation can be done by running the command described. You need to replace the –base-url value with the non-HTTPS URL, of your master environment.
The login credentials can be replaced here.
php bin/magento setup:install \
–admin-firstname=AdminName \
–admin-lastname=AdminLastname \
–admin-email=admin@myhost.com \
–admin-user=admin \
–admin-password=123456 \
–base-url=http://master-7rqtwti-eepi6wrws7crg.us-4.magentosite.cloud/ \
–db-host=database.internal \
–db-name=main \
–db-user=user \
–currency=USD \
–timezone=America/Chicago \
–language=en_US \
–use-rewrites=1
Note: Try uninstalling Magento, if you get an error during the installation- Magento can’t write to the session directory:
php bin/magento setup:uninstall
Install Magento with the setting –session-save=db:
php bin/magento setup:install \
–admin-firstname=AdminName \
–admin-lastname=AdminLastname \
–admin-email=admin@myhost.com \
–admin-user=admin \
–admin-password=123456 \
–base-url=http://master-7rqtwti-eepi6wrws7crg.us-4.magentosite.cloud/ \
–db-host=database.internal \
–db-name=main \
–db-user=user \
–currency=USD \
–timezone=America/Chicago \
–language=en_US \
–use-rewrites=1 \
–session-save=db
After a successful Magento installation, something like the below information will appear –
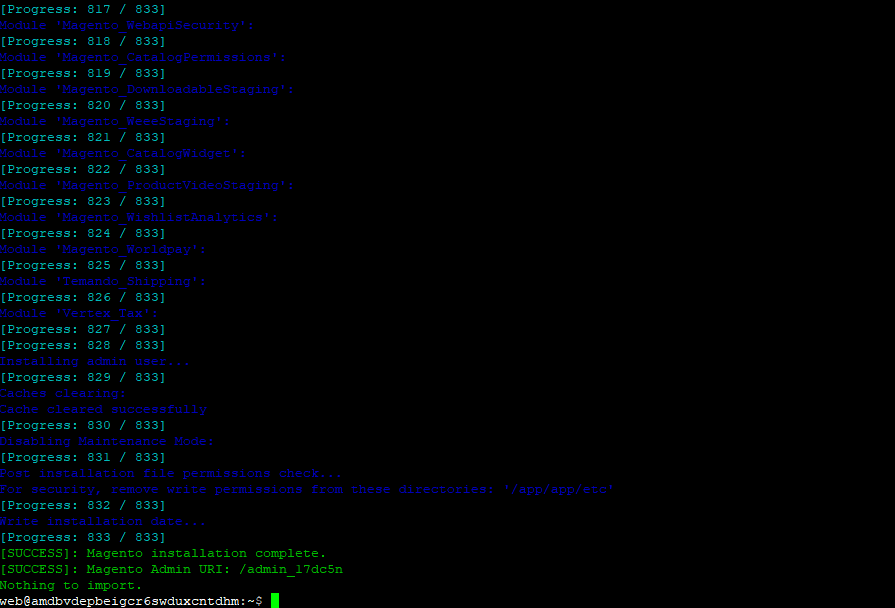
To be able to access the admin panel, copy the admin path. (You can relocate it in app/etc/env.php file, if you forget or lose it)
Now, run the static files deployment:
php bin/magento setup:static-content:deploy
After running static files deployment browse to the Master website once again. The Magento homepage screen is there- pat yourself for great work!

Step 5- Creating and Activating Staging Environment Out Of Master
(1) Staging Branch Creation
Now you need to create the Staging branch. Push it by running the given commands:
cd /var/www/dev
git checkout -b Staging
git push origin Staging
(2) Staging Environment Activation
Firstly, we need to install the Magento-cloud command on the server to activate the Staging environment. For installing it you need to run the following commands in your CLI (SSH):
curl -sS https://accounts.magento.cloud/cli/installer | php
To make the Magento-cloud command start working on the CLI, you have to run the command “su -” or simply restart the SSH.
After re-logging in, don’t forget to return back to the working directory.
Now, login to the Magento cloud by running:
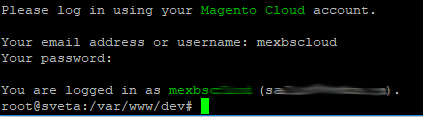
magento-cloud auth:password-login
Thereafter, you will be asked for your Cloud username and password by the system. The Magento website credentials are used by Magento Cloud to log in to their web interface.
The credentials we are asked for now by the system are the old Magento Cloud credentials.
Go to the Magento Cloud interface (https://accounts.magento.cloud/),, to get your Magento Cloud username.
By clicking “Account Settings”, and scrutinizing the “Create New Password” checkbox –
Once your authentication process gets done, you will be able to see the following message:
By running the following command, the staging branch can be activated:
magento-cloud environment:activate Staging
Following a successful deployment, the admin should see a message informing success.
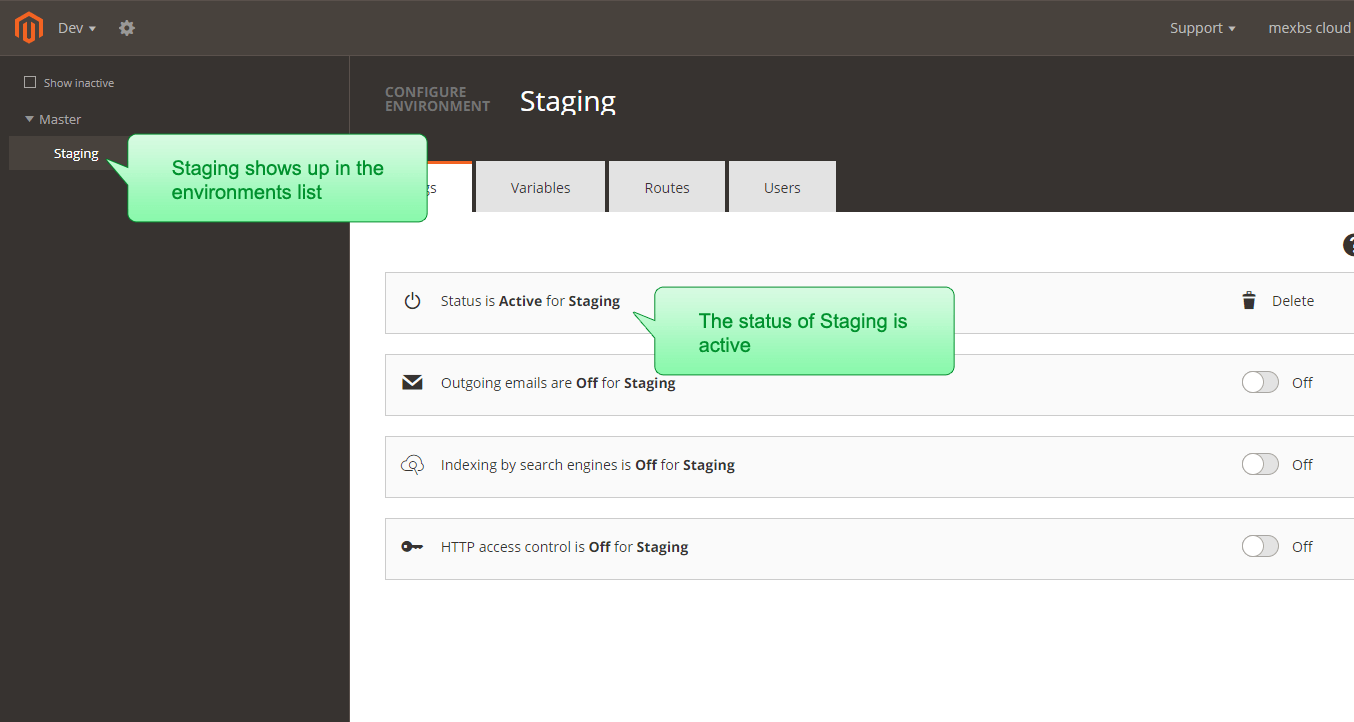
To check whether the environment “Staging” is indeed created and activated, we need to go to the Magento Cloud web interface, our project, and make sure- “Staging” shows up on the top justify of the screen.
After clicking on it, click on the “Configure Environment” button, it’s status will be sawing “Active” –
Now,
o Click on Staging on the top to justify
o Click on “Access Site” and
o Click on one of the URLs –
The Magento homepage will appear on the screen.
The staging environment has Magento already installed. The Database from Master for the Staging environment might have been copied by the Magento cloud, it seems like a timesaver for us to work on duplicating the database yourself.
Important Note: You need to make sure that it didn’t redirect you to the Master URL.
In case it redirects you, follow the given steps to fix the issue:
SSH to the Staging environment, then access the Database by running:
mysql -h database.internal -u user
Thereafter, run this command:
use main;
update core_config_data set value=”http://staging-vdt2zeq-eepi6abcdefgh.us-4.magentosite.cloud/” where path=”web/unsecure/base_url”;
(Don’t forget to replace http://staging-vdt2zeq-eepi6abcdefgh.us-4.magentosite.cloud/ with your staging environment’s URL)
Now, exit the mysql and flush the cache by running the below command:
php bin/magento cache:flush
Step 6: Dev Branch Creation Out Of Staging and Activation
(1) How To Create Dev-Branch?
Create your development branch giving some name as per your wish, here we have given dev4 name to our development branch and push it by running the following commands:
cd /var/www/dev
git checkout -b dev4
git push origin dev4
(2) Dev-Branch Activation
To activate the dev branch environment, run:
magento-cloud environment:activate dev4
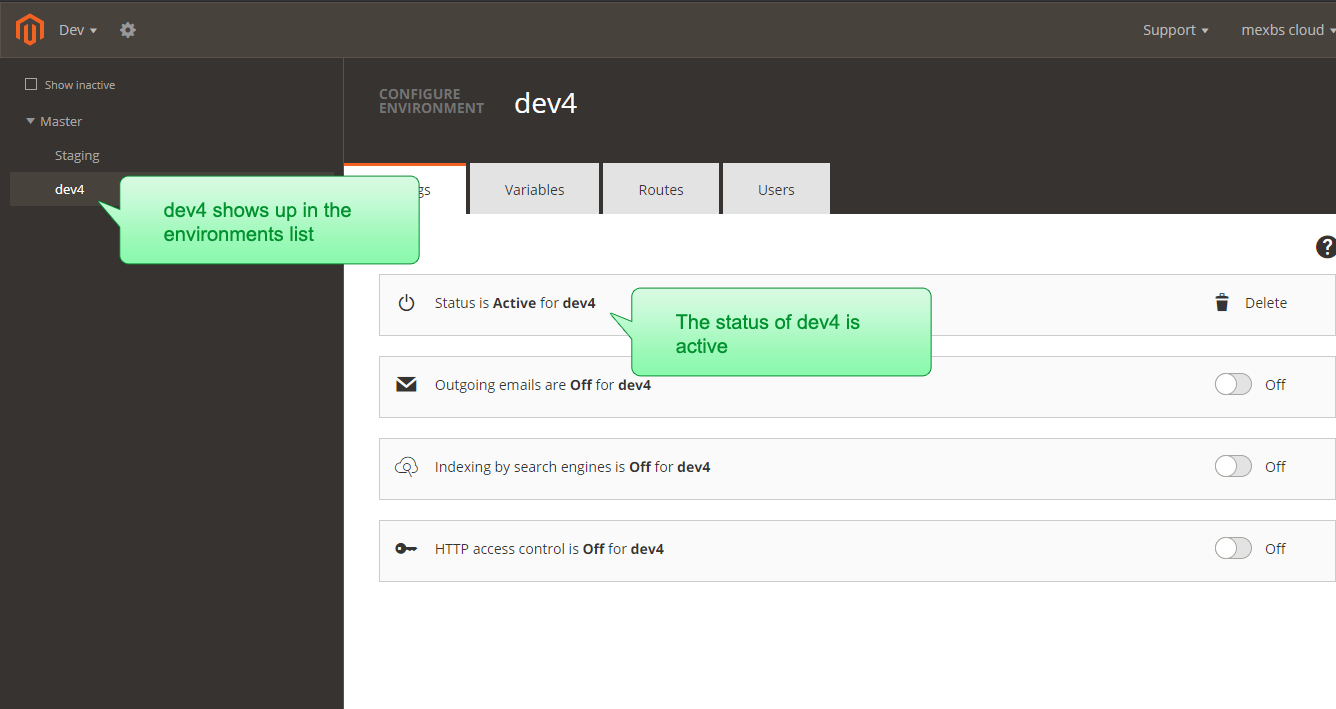
Ensure the successful deployment, you will receive a success message. You need to make sure by checking the environment dev4 is created and activated. To ensure it you need to go to the Magento Cloud web interface, our project, and make sure that “dev4” shows up on the top justify.
By clicking on it, and then clicking on the “Configure Environment”, you will see that it’s status is “Active” –
Now,
o Click on dev4 on the top justify
o Click on “Access Site”
o Click on one of the URLs
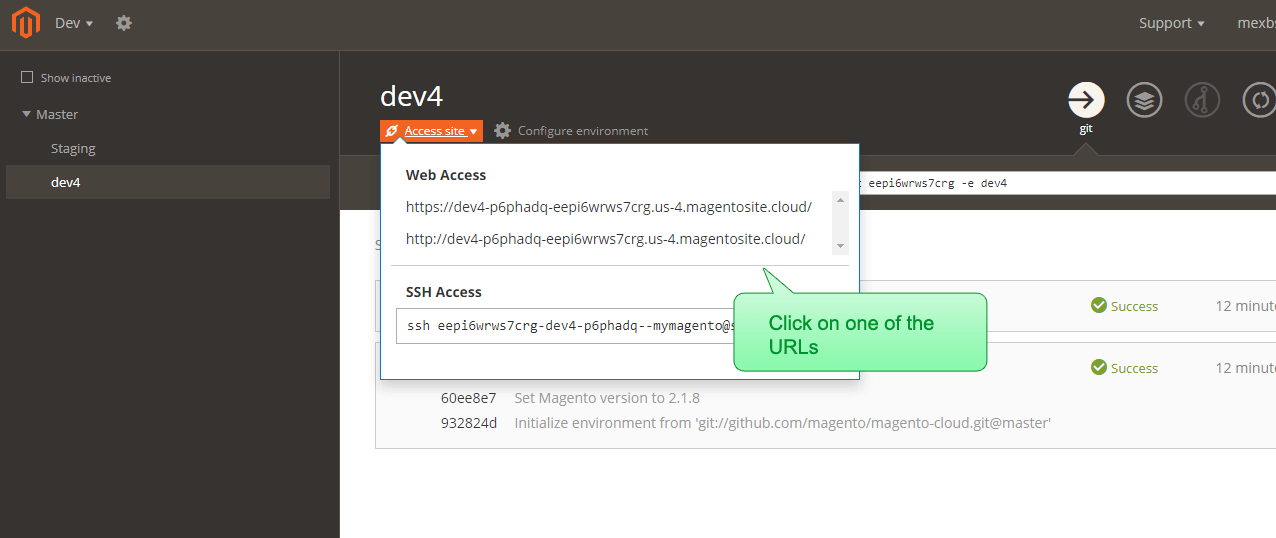
Magento homepage will get appeared
Similarly, to the Staging environment, the dev4 environment have Magento installed on it already (the Database is duplicated from the Master).
Step 7: Set Up A Database & Installation Of Magento On Your Dev Server In The Local-dev Directory
Part- 1
(1) Setup Linux, Apache, MySQL, PHP (LAMP) On Your Dev Server
First of all, install LAMP on your dev machine to develop on it.
(2) Download and Install Magento
Once you are done with setting up LAMP on your dev server, you can download and install Magento.
You need to take care here where you install Magento. You should install Magento in a directory other than the directory where the code of the dev4 branch resides. (In this tutorial the code of the dev4 branch is in /var/www/dev, so we will install Magento in /var/www/local-dev).
It is not advisable to develop the code directly in /var/www/dev, because it has many missing files to run Magento. Rather than that, it is easy to install Magento and work on our features’ development in a different directory.
So, following that we created /var/www/local-dev directory on our dev server and installed Magento there in our tutorial.
Here you need to create a new directory on your server, to install Magento.
Start writing some code Once Magento starts working on your dev server.
Part-2
These steps need to perform over and over again each time you go through a development cycle.
Your environment setup should be ready and you should be able to start developing your features at this stage. Test them locally and deploy them to Dev, Staging, and Master following this order.
Let’s go over the development workflow steps and explain them one by one.
Step 8: Switching To Dev And Staging
Go to the dev directory on your local server and switch to dev4. Now, pull Staging into it and you need to copy the tracked files to local-dev.
While you are on the dev directory of the dev machine, you need to ensure you are on the latest dev4 branch. Now, run the following command:
git checkout dev4
git pull origin dev4
Run the following command to merge in Staging,
git pull origin Staging
In case, you encounter some changes on Staging, you need to push them to your dev4 branch, to keep the remote branch up-to-date:
git push origin dev4
To keep the local environment up-to-date with the changes on dev4 you have to copy the tracked files from /var/www/dev to /var/www/local-dev.
cp -a /var/www/dev/app/* /var/www/local-dev/
cp -a /var/www/dev/composer.json /var/www/local-dev/
Step 9: Developing Feature In Local-Dev
Let’s work on the feature in the local dev directory.
We are going to create a Star Lights module. It will display a “Star Lights” message in the header.
(1) Add StarLights Module
Create the Star Lights module by creating the following files in /var/www/local-dev: app/code/Mexbs/StarLights/registration.php
__DIR__
);
app/code/Mexbs/StarLights/etc/module.xml
app/code/Mexbs/StarLights/view/frontend/layout/default.xml
app/code/Mexbs/StarLights/etc/module.xml
app/code/Mexbs/StarLights/view/frontend/templates/star_lights.phtml
Star Lights!!!
(2) Install StarLights Module On Your Local Environment
To install the Star Lights Module on your local dev server you need to run the following commands
php bin/magento module:enable Mexbs_StarLights –clear-static-content
php bin/magento setup:upgrade
php bin/magento cache:flush
php bin/magento setup:static-content:deploy
(3) Testing The Feature
Let’s go to the HomePage
The home page will be showing the “Star Lights!!!” message in the header.
Now, it’s time to commit it, push and deploy to dev4.
Step 10: Copy The Contents Of The App Directory From Local-dev to Dev4 Directory
Now you need to copy the content of the app directory from /var/www/local-dev to /var/www/dev. To copy it you need to run the following command:
mkdir /var/www/dev/app
cp -r /var/www/local-dev/app/* /var/www/dev/app
Now add the changes you want to git:
git add app/
Step 11: Commit To Dev4 And Push
Commit and push the changes to dev4 by running:
git commit -m “Added StarLights module”
git push origin dev4
Go to the dev4 environment frontend. There you should see the “Star Lights” showing up!
Step 12: Check Whether Dev4 Is Ready To Go Live
If there is any problem or bugs in the feature and you think it’s not ready to go live – go back to Step 8.
If it’s ready to go live, proceed to the next step.
Step 13: Merging
Merge Dev4 to the staging branch and push it directly or using a pull request
Now, let’s understand Why is it important to merge to staging instead of directly merging to master?
Following are the reasons why it is essential to merge your dev branch to Staging (once the feature is ready) and not directly to master:
(1) Set up wise the staging is much closer to the production environment (master environment) than dev4.
It has Fastly and New Relic already installed on it.
Staging and production share the same dedicated server on the pro plan.
(2) Staging is the perfect environment to test features together- if more than one developer is working on the project – before merging them into production
Run the following commands to merge the dev4 to staging.
git checkout Staging
git pull origin Staging
git pull origin dev4
git push origin Staging
You will be able to see the “Star Lights!!!” showing up on the Staging home page after the cloud build is completed.
Step 14: Feature Testing
Check here how your features work on staging. If for some reason the feature doesn’t work correctly on Staging you can debug it on your local server and then proceed to Step 8.
Sometimes it doesn’t work because it can’t comprehend the features of other developers, or doesn’t work with Fastly, etc.
If it works properly proceed to the next step
Step 15: Merge The Staging Branch To The Master
At this stage, your feature is about to be deployed to production!
Follow the following steps:
git checkout master
git pull origin Staging
git push origin master
Now the master build should have begun and after the completion, the “Star Lights!” message should show up on the production home page.
So, our first development cycle is completed.
Now What?
After getting your new features and bug fixing you simply need to go to step 8 and start working from there until you reach this step.
The Modified Development Flow For Pro Plan

The integration and the global master branches related few new steps are added. The new steps are indicated. The identical steps for started and pro plans are not mentioned in the modified steps. From here we are going to explain the modifications that are made in the steps in the flow.
Modifications that are made in the flow are:
Modification In Step 4
Create the Global Master environment out of the master. Activate the Global master environment. Follow step 5- Use the name of the Global Master branch instead of Staging.
Modification In Step 5
You need to create the Integration branch out of Staging and activate the Integration environment.
To perform this step, you have to follow step 5, use Integration instead of Staging.
Modification IN Step 6
First, create the Dev4 branch out of integration and activate the dev4 environment.
Here small changes are integrated- here dev4 branch is created out of the Integration branch instead of Staging.
Modification In Step 8
Follow the following steps:
● Firstly, Go to the dev directory on your local server
● Switch to dev4
● Pull integration into it
● Copy the tracked files to local-dev
Here we pull integration into dev4 Instead of pulling the Staging.
Modification In Step 12
Step 12.1
Here you need to merge dev4 to the integration branch and push it directly or use a pull request.
Here, follow step 13 and use integration instead of Staging.
Step 12.2
Feature testing
This step is to check whether the feature works well or not in the Integration environment. Now it’s ready to merge with Staging.
Modification In Step 15
After merging to master this is the extra step we are performing.
To Merge the master branch to the Global Master run the following commands:
git checkout [name-of-Global-Master]
git pull origin master
git push origin [name-of-Global-Master]
Name-of-Global-Master needs to be placed with the name of the branch, which is your Global Master branch.
What Is Next For The Pro Plan?
After getting new features and bug fixing to get worked upon, you need to go to step 8 and work from that step until you reach this step of development.
Magento Experience
For the development cycle, Adobe Commerce Cloud is an excellent solution that is helpful in the infrastructural part. Server maintenance, deployment, downtime, git hosting, and more are taken care of very conveniently. You just need to develop, test your feature, and go live.
In this tutorial, the Magento Cloud Starter plan and the Pro plan workflow chart for development are explained and presented to help you get started with Magento cloud development.